How to Use MIDI Polyphonic Expression (MPE) in Ableton Live
Published on Wednesday 22 November 2023

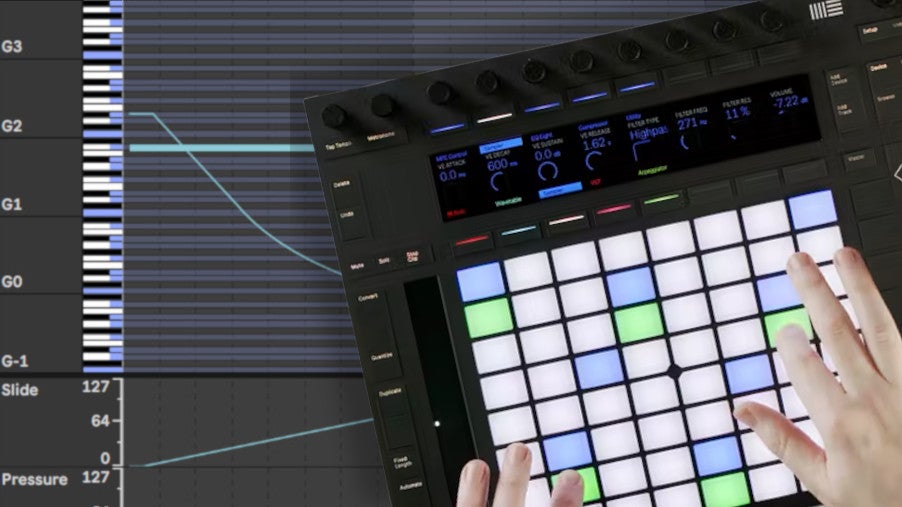
Ever wondered what MPE, or MIDI Polyphonic Expression can do for your Ableton Live productions? Guest-blogger Hens Zimmerman is here to explain the potential of this ground-breaking MIDI feature and show you how MPE can be used to shape super-expressive sounds.
MIDI Controller Compatibility
MPE supports the following parameters for single notes and chords:
- Strike/Velocity sensitivity
- Glide / Note Pitch Bend
- Slide
- Press sensitivity (when a key is held down)
- Lift/Release sensitivity
These parameters can be used in various ways. Glide is perfect for pitch modulating of single notes, while Slide can serve as a filter modulator, allowing you to use MPE to play a chord where the filter cutoff for each note can be individually set. However, let me point out that not every keyboard and controller supports all MPE parameters. The Ableton Push 2 controller, for example, supports Velocity and Press but won’t work for Glide or Slide. Luckily, as you’ll see in a bit, just two parameters alone can open up a ton of expressive options. To unlock the full potential of MPE, you’ll need a keyboard like the Keith McMillen K-Board Pro 4 or Roli Seaboard Rise. Or a mobile app that allows you to play with Glide and Slide modulation, like Kai Aras KB-1 Keyboard Suite.
MPE in Ableton Live
While more will follow in the future, right now, the current version (11.1.5) of Ableton Live comes with the following MPE-compatible tools:
- Sampler
- Simpler
- Wavetable

Ableton Live MPE Compatibility Indicator
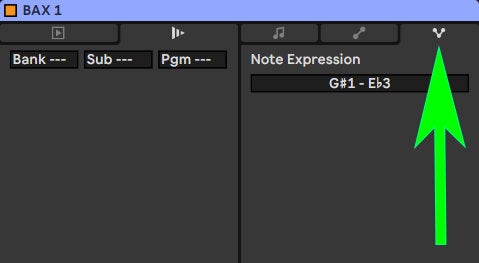
In the image above, it says ‘MPE’ in the top right corner, which indicates that the selected tool supports MPE. Also, since MPE info is registered per note, you might not find MPE automation where you’d expect to. Shift-Tab to Clip View and open up the third tab to find it (as seen in the image below).

Note Expression in Ableton Live Clip View
The Slide, Pressure, Velocity and Release Velocity parameters each come with their own automation lane found below the MIDI note editor. You can hide/show the lane for each modulation parameter with the button in the bottom left corner (see the image below).

Button for hiding/showing the Slide, Pressure, Velocity and Release Velocity parameters
The Glide parameter, which is commonly used for single-note pitch bends, can be found in the MIDI editor. Important: disable Fold or else the Glide automation lane will remain invisible. In the image below, you can see how MPE Glide modulation is visualised per note in the MIDI editor.

Glide automation as seen when the Fold function is turned off
While MPE modulation is designed for live performances, you can simply tweak the automation curves the same way you’re used to. This means you can refine your performances or add movements that would be impossible to pull off. It even means you can draw up MPE data for every note, even if you’re using a controller that doesn’t support MPE. What’s also pretty neat is that all MPE parameters are copied or moved per note, making it easy to duplicate things. In the image below, you can see how I applied MPE automation with the Ableton Live curve tool and how it repeats for every note.

Inhumanly tight MPE pitch dives copied per note
Modulation
Ultimately, the results of your MPE automation hinge on how you end up incorporating it into your live sound, so let’s do a little case study where we create an MPE-style instrument using Ableton Live’s Sampler, and where the filter cutoff for each note can be played with in real-time through the Press sensitivity of an Ableton Push 2 controller.

Sampler instance with basic sawtooth sample
Start by creating a track using the Sampler. Since there’s no sound to begin with, drag a sample to where it says ‘drop sample here’. While I’m going with a basic sawtooth here, any sound that contains some harmonics we can filter out again will do. After you’ve loaded a sample, be sure to play a couple of notes with your Ableton Push 2 to make sure everything’s hooked up correctly.
Next, locate ‘MPE Press Destination A’ in the bottom left corner of Sampler’s MIDI tab. Here, select ‘Filter Freq’ and set the value for ‘MPE Press Amount A’ to 100 as seen in the image below.

Press modulation for Sampler Filter Freq
Since this filter is set to fully open by default, you won’t hear any effect yet. In the image below, you can see how I’ve tweaked the low pass filter a little so that putting more pressure on the keys of my Ableton Push 2 controller will actually open it up a little more. Also, feel free to experiment with the other filter settings here.
Now play some notes before tweaking the Pressure one by one for every finger while you play a chord. If all is well, you’ll be able to hear how pressing down harder opens the filter more. You might even find that Sampler reacts a little too strongly here. If so, just tone down the Pressure value a little. Any notes you play and record can be found in the Arrangement View of your Sampler track. Double-click on the recorded MIDI clip and open the Note Expression tab to view and edit the Pressure automation. By the way, if you want to use MPE Glide (Note PB) for something other than pitch, remember that the Note PB already has an effect on the pitch, as you can see on the right in the Sampler MIDI tab just below Range. Here, you’ll have to set the Range value to 0 if you don’t want your gliding movements to affect the pitch.

Pressure automation in the Note Expression tab
MPE Control
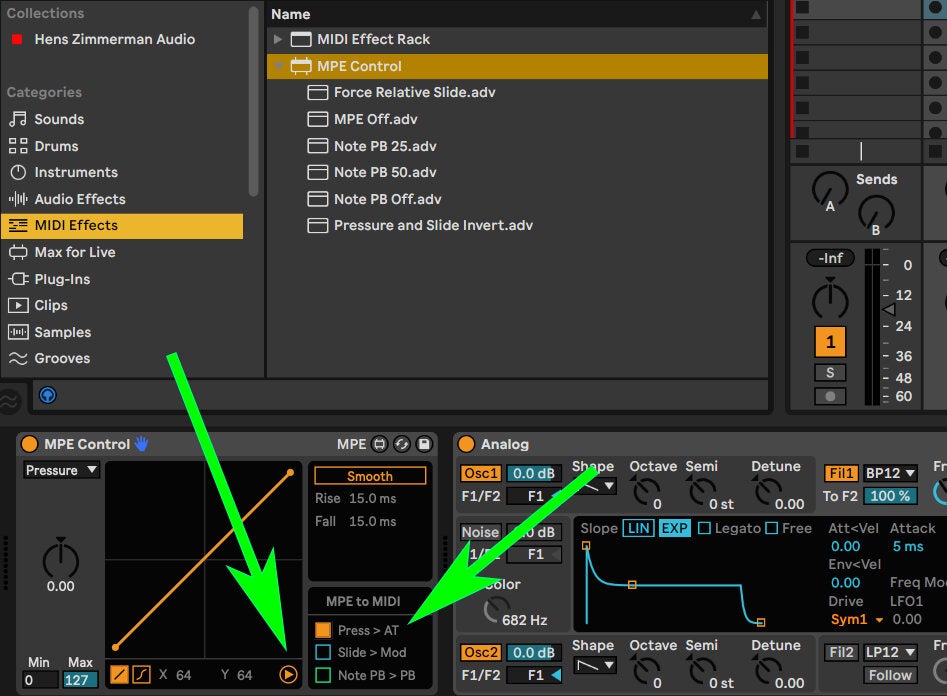
Lastly, I want to show you a little trick where you can use aftertouch in combination with an instrument that doesn’t support MPE. As a little illustration, we’re going to map MPE polyphonic aftertouch to the filter frequency of Ableton Live’s Analog instrument. Other than note on/off, Analog doesn’t respond to pressure exerted on Push 2 keys by default, so how sweet would it be to tweak it so you can ‘unlock’ Press data? While Analog doesn’t support MPE in full (yet), you can convert Press data into MIDI aftertouch and map it to Analog’s filter frequency.
First, you need to insert an MPE Control effect for Analog. If you’re running Ableton Live 11, you can find this effect in the MIDI Effects category. Next, open the MPE Control settings and select Press > AT as seen in the image below. Selecting the Press > AT setting basically turns MPE poly pressure into monophonic MIDI aftertouch.
Now, you’re going to need an effect for Aftertouch to map to Analog’s filter frequency. As standard, Ableton Live 11 Suite comes with the Expression Control effect, which will do the job and can be found in the Max for Live category. Stick this effect between MPE Control and Analog, then click on the blue Map button next to Aftertouch before clicking on Freq in Analog. Finally, pick a nice filter that isn’t opened all the way and you’ll now be able to exert Aftertouch-pressure on your Push controller keys and hear it back in the filter frequency. Granted, it’s not polyphonic but it’s a nice little lifehack that lets you do even more things with your Ableton Push 2.

Mapping Aftertouch to filter frequency with Max for Live Expression Control
Closing Thoughts
I hope this blog has given you some new ways to play around with MPE. It’s one of the biggest developments in MIDI of late and seriously boosts the expressive potential of virtual instruments. More MPE-compatible hardware controllers are expected to pop up on the market soon, so already knowing how MPE can help you take your productions to the next level just might give you the edge on your peers. Enjoy!
See Also
» Ableton Live
» MIDI Keyboards
» MIDI Controllers
» DAW Software
» Effect Plugins
» Instrument Plugins
» All Studio & Recording Gear
» Getting started with iPad music production
» How to Sell a Beat
» How to be a ghost producer to raise capital for your career
» 5 reasons why you are not a full-time producer yet
» Mixing the Low-End: How to Get that Thick & Punchy Layer
» Should You Mix with Headphones?


