MIDI Generative and Transformation Tools in Ableton Live – Inspiration on Tap
Published on Tuesday 12 May 2026

We all know the struggle: no inspiration! Or maybe even worse: plenty of inspiration, but no idea how to turn it into a solid result. Since version 12, Ableton Live has included a brilliant set of tools to help with exactly that. In Ableton Live they’re called MIDI Generative tools and MIDI Transformation tools.
Where do you find them?
In figure 1 and 2 you can see where to find these tools in the Clip View. The name says it all: these are tools for editing MIDI notes in your piano roll editor. The MIDI Generative tools create new notes, and the MIDI Transformation tools change existing notes. That split isn’t entirely clean, though, because some MIDI Transformation tools also generate extra notes. In figure 2, for example, you can see the Chop transformation tool, which divides an existing note into multiple separate notes.

Figure 1: MIDI Generative tools (Rhythm)
It’s useful to know that these tools work for all kinds of MIDI notes: drums, monophonic instruments, and polyphonic instruments alike. It’s also important to realise you can use these tools at any stage of the production process. For example, if you’re looking for a variation on a rhythmic clip you’ve already made, you can generate an extra percussion sequence using a MIDI Generative tool like Rhythm. Or you can reshape an existing snare pattern into a pick-up/lead-in using a MIDI Transformation tool like Chop or Ornament.

Figure 2: MIDI Transformation tools (Chop)
Behind the scenes, all of these tools work as Max for Live devices, which means there’s a growing market of third-party MIDI Generative tools and MIDI Transformation tools. Not only that: you can also roll up your sleeves and build your own creative tools! In this article we’ll look at both options.
MIDI Generative tools
Ableton Live ships with the following MIDI Generative tools: Rhythm, Seed, Shape, Stacks and Euclidean. We won’t go through all of them in this article (that’s what the Ableton Live manual is for). But to get a feel for what’s possible with the MIDI Generative tools, we’ll take a closer look at Rhythm. In my opinion, it’s one of the most useful tools that comes as standard with Ableton Live 12 and up.

Figure 3: An empty MIDI clip
Our adventure begins with a MIDI clip on a Drum Rack. So load your favourite Drum Rack in a MIDI track and double-click on a clip slot. In this example I’m using a Drum Rack called CapInHisGlass. In figure 3 you can see what it looks like on my end. Click the fifth tab under Clip, because that’s where the MIDI Generative tools live. If the Rhythm tool isn’t selected, you can choose it from the drop-down menu (see figure 4).

Figure 4: Available MIDI Generative tools
The Rhythm tool lets us experiment with different patterns per drum instrument. It’s handy to keep Auto switched on, because then you’ll hear the result immediately. At the top of the Rhythm tool, choose which drum instrument you want to experiment with. As soon as you turn one of the controls, Rhythm generates a pattern in your piano roll. In figure 5 you can see where the Auto button is. You can also see that I chose the drum instrument HH AndAhh4. For hi-hats and lots of other percussion instruments, you’ll often set Step Duration to 1/16. But nothing’s mandatory—try anything. Now is a great moment to play the clip and experiment with the different Rhythm settings. Don’t forget to adjust Velocity in the bottom-left as well. This adds loads of human feel and variation to the patterns this tool generates.

Figure 5: Auto mode enabled
You’ll see that while experimenting, you can also choose different drum instruments. Rhythm will then generate a pattern on another lane in your clip. But what if you want to expand your clip with more and more sounds? As soon as you’re happy with a pattern, you can click anywhere empty in the piano roll. The pattern then becomes part of your clip. It’s also worth knowing you can add notes yourself in a clip. To keep some structure in my experiment, I added a kick drum and clap to my clip. That’s the green block in figure 6. The two hi-hat patterns, on the other hand, were generated by the Rhythm tool. You can hear what that sounds like below. Also notice the velocity variations Rhythm generated—this isn’t something I would have come up with in quite the same way.
 Figure 6: Two patterns from Rhythm and two patterns I drew myself
The nice thing about the MIDI Generative tools is that they can serve as a starting point for a new track, or for a section of one. Once you’ve generated something with these tools, you can completely shape the results to taste. I quickly got bored of the four-on-the-floor vibe of my experiment and rebuilt it into more of an electro feel. There was also room for a conga, which I generated using Rhythm again. In the end, my largely computer-invented rhythm sounds like this:
 Figure 7: Another conga made with Rhythm. In green: my own little pattern
MIDI Transformation tools
The second group of MIDI tools changes existing MIDI notes. These are the MIDI Transformation tools. Some of these tools can chop up existing notes into pieces and, in that sense, generate “new” notes too. In any case, what you feed into a MIDI Transformation tool is one or more notes (which can also be the notes of a chord). Let’s look at an example together. We’ll start from the rhythm I created above. Let’s say we want a kind of rattling lead-in at the end of four bars. Of course we could draw all the MIDI notes by hand, but how nice would it be to create a smooth roll that starts very fast and then gradually falls back into the groove.
First, we manually create one long note. I’m using a snare drum that starts on 7 and a half, but feel free to use your imagination: place a long note somewhere in your clip that lasts at least one beat (a quarter note). In figure 8 you can see what it looks like for me.
 Figure 8: One long snare drum, drawn by hand
To make it rattle, we need to chop that one note into lots of separate notes. To do that, we go to the MIDI Transformation tools tab and choose Chop from the drop-down menu. Figure 9 shows what that looks like. As soon as you turn the Parts knob, you’ll see your single note being divided into slices. For this example, it doesn’t matter exactly how many slices you choose, but 15 or 16 is a good number.

Figure 9: The Chop MIDI Transformation tool
In figure 10 you can see roughly what it should look like now. Our single snare hit is now a linear roll of separate notes. Not very exciting yet, no.
 Figure 10: Chop divided one snare hit into lots of separate notes
But we’re not done yet! As promised, the snare roll should start very fast, then slow down so that the last snare lands back on a sixteenth note of our original rhythm. We stay within the MIDI Transformation tools and now choose Time Warp. Set Quantize to Off, Range to Fit, and Note End to Include. Also activate the second point on the curve at the bottom of Time Warp. Figure 11 shows what that looks like.

Figure 11: Time Warp
Now we can move that second point on the Time Warp curve up and down, until the last sixteenth of our roll lands back on the grid. Figure 12 shows what I mean. If that feels a bit too nerdy, you can of course just play the clip and adjust the Time Warp settings by ear until it feels right.

Figure 12: The end result of our exercise
Time Warp is a very handy tool for genres like IDM and EDM. To finish things off, I added an Auto Filter on top (figure 13).
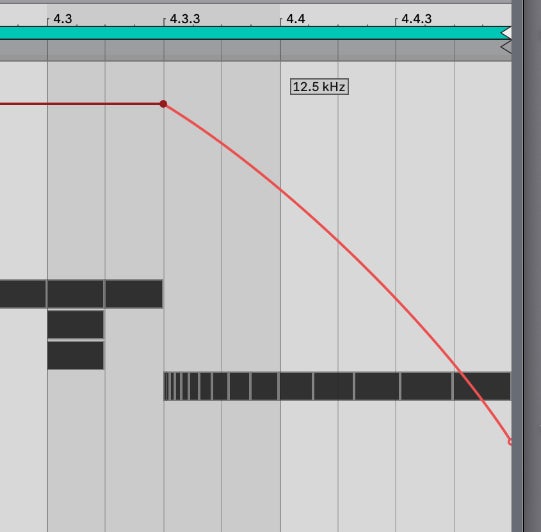
Figure 13: Auto Filter LPF frequency curve
The final result sounds like this:
Third-party tools
It’s good to know that all sorts of developers are building new MIDI Generative and Transformation tools. A great recommendation is the free MIDI Tools pack by Philip Meyer. You can find it on Ableton Live’s Packs page or via this link:

Figure 14: Philip Meyer’s MIDI Tools on the Ableton website
Installing this pack adds three MIDI Generative tools:
- Polyrhythm
- Phase pattern
- Stages
…and two MIDI Transformation tools:
- Retrigger
- Slice Shuffler
My personal favourite from this list right now is Phase pattern. It makes it easy to generate glitchy patterns that are inhumanly complex. Just look at what’s happening in figure 15. One really nice thing about Phase pattern is that you can also set velocity across the curves that are created.

Figure 15: Building insanely good patterns with Philip Meyer’s Phase pattern
If you can’t get enough, Philip also sells a few extra, very advanced generators and transformers via his own website.
And we wouldn’t be complete without mentioning one other brilliant MIDI Generative tool: M2TM Progressions. With this, you can try out and tweak chord progressions endlessly. You’ll hear what you’re doing instantly, which makes it easier to push through a creative block. This tool isn’t free either, but for around twenty quid it’s absolutely worth it.

Figure 16: M2TM Progressions builds chord progressions in your piano roll
Build your own Transformation tool!
Behind the scenes, all of the tools mentioned above use the programming language Max. In this section, we’ll build a genuinely useful MIDI Transformation tool together. This part is a bit technical, and it’s not essential if you simply want to have fun with the new possibilities in Ableton Live. With what we’ve covered above, you can already make and edit music in fascinating ways in Live. But if you don’t mind getting your hands dirty, roll up your sleeves—here we go. We’ll assume you already know your way around Max reasonably well.
First, the idea. When we enter harmonies in our piano roll, they consist of multiple notes stacked vertically. Simple chords (triads) have three notes, but we can also use more complex chords, like a dominant seventh or an add9. In many cases, it’s interesting to try variations on these chords where one or more notes are played an octave higher or lower. In figure 17 you can see what we mean: A#3 becomes A#4. Technically it’s still the same chord, but it sounds much more exciting than simply playing the same chord twice. This is something we can achieve with a MIDI Transformation tool.

Figure 17: Dropping one chord note by an octave already creates a sense of movement
So we’re going to build our own MIDI Transformation tool. Under the Transformation tools tab, choose Max MIDI Transformation and click the small circle in the bottom-left. This opens Max with a blank MIDI Transformation tool that doesn’t do anything yet. In figure 18 you can see how we start.

Figure 18: Starting a blank MIDI Transformation tool
If all goes well, Max now opens the blank MIDI Transformation tool. It does absolutely nothing, because it sends whatever comes into a [live.miditool.in] straight back out through a [live.miditool.out]. For understanding what’s going on, it’s useful to look at what comes out of the first and second outlets of [live.miditool.in]. These are “dictionaries”. We can create two [dict.view] objects and connect them to [live.miditool.in]. That way we can see what comes in at any moment. A “bang” into the input of [live.miditool.in] is the same as clicking Transform in Ableton Live, so it’s handy while building our tool. In figure 19 you can see what it looks like so far.

Figure 19: What comes into our MIDI Transformation tool?
The first dictionary gives an overview of all selected notes, with information per note such as pitch, length, and start time. The second dictionary is a more global overview of the clip itself. In there you’ll find, for example, information about the selected grid, the clip scale, etc. To build our tool without making this article overly complicated, we’re only interested in the pitch of each note. We want to randomly move that pitch up or down by 12 semitones from time to time. That means we need to iterate over the incoming notes and return them to Ableton Live in a slightly modified form.
The way to do this is with a [dict.unpack notes:]. Don’t forget the colon after notes.
As you can see in figure 20, [dict.unpack notes:] returns an array containing all our notes. The size of the array depends on what we feed into our MIDI Transformation tool at any given moment. That could be one chord or an entire progression spanning several bars. I’ve put a message box after [dict.unpack notes:] so you can see that an array comes out. We can iterate through that array using an [array.map] object. You can compare this to a “for-loop” in many other programming languages. The middle outlet of [array.map] gives us one element from the array as input, which we’re free to change. We send our modified element back into the right inlet of [array.map]. Only then does the result continue down the path of our Max patch. For now, we’ll just put a [zl.reg] in between, which effectively does nothing. Figure 20 shows what it looks like so far.

Figure 20: Our MIDI Transformation tool still does nothing
Now is also a good time to save your Max patch. I’m calling it “Bax inverter”. Physically, the file is saved as an .amxd file in:
~/Music/Ableton/User Library/MIDI Tools/Max Transformations
…unless you’re using a different location for your User Library, of course.
We’re now going to replace [zl.reg] with a little trick. From the middle outlet of [array.map], we receive our note information one by one as dictionary objects. But we’re only interested in the pitch of each note. We can access that easily with a [dict.unpack pitch:], but we must pass all the other information back into a [dict.pack pitch:] below. If we didn’t, we’d lose crucial note data. Conveniently, the right outlet of [dict.unpack] passes through all the dictionary entries we’re ignoring. The right inlet of [dict.pack] catches those unused entries again for us. In figure 21 you can see this connection clearly. For now, we print the notes we receive to the Max console using a [print] object, just to check everything works.

Figure 21: Our MIDI Transformation tool still does nothing, but we can already see the right notes coming in
Note: If you’re wondering why we don’t connect the right outlet of [dict.unpack notes:] to the right inlet of [dict.pack notes:]… good question! The answer is that the dictionary we receive consists solely of notes objects. In other words, we’re not ignoring any entries from the dictionary we’re given.
Finally, we roll the dice. The chance we do nothing to the note is 1/3rd, the chance the note moves 12 semitones down is 1/3rd, and the chance the note moves 12 semitones up is 1/3rd. That may be a bit heavy-handed, but for now it’s a workable concept. In figure 21 you can see our working MIDI Transformation tool. We add 0, -12 or 12 to each incoming note. Try it out in Ableton Live. Don’t forget to save your Max patch first. You can click Transform several times, and each time a different note layout appears in your piano roll. If nothing happens, you probably don’t have any notes selected.
Figure 21: Our MIDI Transformation now changes chord notes!
If you work with our freshly built tool for a moment, you’ll notice the situation isn’t ideal yet. There are two issues:
- Existing notes sometimes get overwritten.
- We’d like to be able to limit the pitch range of our action.
We can solve the first issue by checking whether we’re about to create a note that already exists. That means we need to build a collection of all notes in advance and check we won’t overwrite anything.
We can solve the second issue by specifying a lower and upper limit for our output. In figure 23 you can see a somewhat blunt approach to solving both issues with a large “if … else” statement. You can offer the lower and upper limit as MIDI note interfaces to the Ableton Live user. This implementation works perfectly well, and you can already experiment quite nicely with random chord inversions. But once you’ve got the taste for it, you can of course make this tool far more subtle.
So…
Now you know what the new MIDI Generative and Transformation tools in Ableton Live can do. These are serious expansions of your musical possibilities—and not something you’ll quickly find in other DAWs. You’ve also seen that you can make these kinds of tools yourself using Max. But even without that, you can now create and edit melodies, chords and rhythms in a completely new way in Ableton Live. Have fun!


No comments yet...